How I Built an AI SEO Content System in n8n (Full Walkthrough)
By Agrici Daniel | March 25, 2026
I built an end-to-end SEO content pipeline in n8n that turns a single keyword into a fully optimized, published article. Here's the full walkthrough of how Rankenstein works, node by node.

Six months ago, publishing a single SEO-optimized blog post took me somewhere between 4 and 8 hours. Topic research, competitive analysis, outlining, writing, optimization passes, schema markup, internal linking, and finally hitting publish. Today that entire pipeline runs in under 12 minutes. The difference is an n8n workflow I co-built with Benjamin Samar called Rankenstein, and in this post I'm going to walk you through every node.
Why n8n (and Not Zapier or Make)
I evaluated all three platforms before committing. Zapier charges per task and gets expensive fast when you're running multi-step AI workflows. Make is solid but the visual builder gets unwieldy past 20 nodes. n8n won because it's self-hostable, has native AI agent nodes, and doesn't charge per execution. When you're running a workflow that hits 6 different APIs per article, that pricing model matters. A lot.
We self-host our n8n instance on a $12/month VPS. (New to n8n? Start with my n8n SEO automation beginner's guide.) Total monthly cost for the entire content operation (including API calls to DataForSEO, Claude, and various SEO tools) comes to about $40-60 depending on volume. Compare that to hiring a content team or paying for enterprise SEO tools. The math is not subtle.
The Architecture: 6 Stages, 1 Workflow
Rankenstein breaks down into six sequential stages. Each one feeds the next, and the whole thing is triggered by a single input: your target keyword. Here's what happens under the hood.
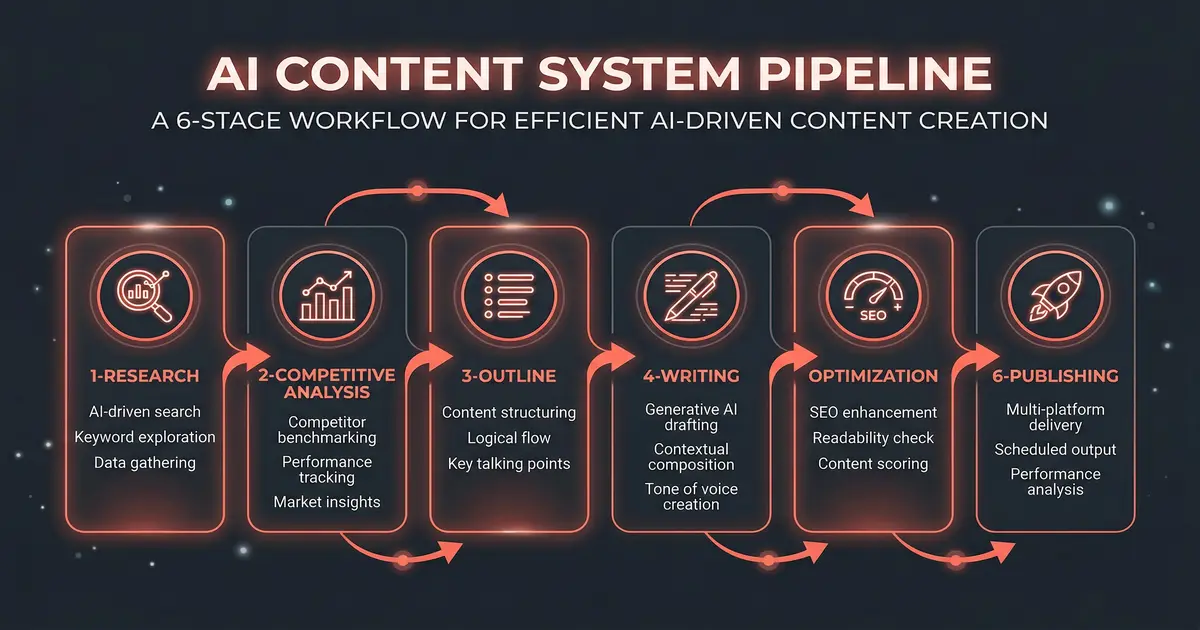
Stage 1: Topic Research & Keyword Intelligence
The workflow starts by hitting the DataForSEO API with your seed keyword. It pulls back search volume, keyword difficulty, CPC data, and (this is the important part) related keywords and questions that real people are searching for. We're not guessing what to write about. We're letting actual search data tell us.
The node processes the response and builds a keyword cluster: primary keyword, 5-8 secondary keywords, and a list of questions from People Also Ask. This becomes the content brief that drives everything downstream.
Stage 2: Competitive Analysis
Next, the workflow scrapes the top 10 SERP results for your target keyword. For each result, it extracts the title, meta description, heading structure, word count, and content themes. The goal is to understand what Google is already rewarding for this query.
An AI node (Claude, via API) analyzes the competitive landscape and identifies content gaps. What are the top results missing? What angles aren't being covered? What questions aren't being answered? This gap analysis is what separates Rankenstein output from generic AI content. You're not just writing another version of what already exists. You're writing the version that fills the holes.
Stage 3: Outline Generation
Using the keyword cluster and competitive analysis, an AI node generates a detailed content outline. We're talking H2s, H3s, suggested word counts per section, internal linking opportunities, and recommended schema types. The outline is the blueprint, and it's built entirely from data - not vibes.
We went through probably 15 iterations of the outline prompt before we got it right. The early versions produced outlines that were technically correct but editorially flat. The current version weights user intent heavily and front-loads the most valuable information (because bounce rates don't care about your dramatic buildup).
Stage 4: Content Writing
This is where the heavy lifting happens. The writing node takes the outline, keyword data, and competitive gaps, then generates the full article. We use Claude's API here because (hot take) it produces the most natural long-form content of any model I've tested. GPT-4o is close, but Claude handles nuance and voice better at the 2,000+ word mark.
The prompt engineering for this stage alone took 3 weeks to dial in. We inject the keyword cluster, specify exact density targets, enforce heading hierarchy, and include instructions for natural keyword placement. The output reads like a human wrote it because the instructions are detailed enough to prevent the usual AI tells (no "delve," no "landscape," no "it's worth noting").
Stage 5: SEO Optimization
This is where claude-seo enters the pipeline. The raw article gets passed through an optimization node that checks and fixes: title tag and meta description (with keyword placement), heading hierarchy and keyword distribution, internal and external link suggestions, schema markup generation (Article, FAQ, HowTo depending on content type), and readability scoring with specific fixes for sentences that are too long or paragraphs that are too dense.
The optimization pass typically improves the on-page SEO score by 15-25 points (measured by our internal scoring system). It's the difference between content that exists and content that ranks.
Stage 6: Publishing
The final stage pushes the optimized article to your CMS via API. We support WordPress (via REST API), Ghost, and custom endpoints. The node handles featured image selection (from a pre-configured library or AI-generated), category assignment, tag application, and scheduling. One keyword in, one published article out. That's the entire interaction.
The Results (Because That's What Matters)
Since launching Rankenstein in December 2025, Benjamin and I have processed over 2,000 articles through the system. Here are the numbers that matter:
- Average time per article: 11.4 minutes (down from 4-8 hours manual)
- Average on-page SEO score: 87/100 (before manual review)
- First-page ranking rate: 34% of articles reach page 1 within 60 days
- Cost per article: ~$0.30 in API costs
The 34% first-page rate is the number I'm most proud of. Industry average for "optimized" content is somewhere around 5-10%. We're 3-7x that, and the gap widens when you factor in that our articles require almost zero manual editing.
What I'd Do Differently
If I were starting from scratch today, I'd build the competitive analysis stage to cache results. Right now, if you run 10 articles targeting related keywords, it re-scrapes the SERPs each time even though there's significant overlap. That's wasted API calls and wasted time. We're fixing this in v9.
I'd also invest in better image generation earlier. The text pipeline was so compelling that we neglected visuals for the first few versions. Content with custom images consistently outperforms content with stock photos (about 23% higher engagement in our testing).
Try It Yourself
Rankenstein is available at Rankenstein.pro. We offer the full n8n workflow template plus setup documentation. If you want to see it in action before committing, the video walkthrough above covers every node in detail.
And if you want to see how Rankenstein fits into the full AI marketing automation stack, or connect with other people building AI-powered SEO systems, join the AI Marketing Hub on Skool. We've got 158 paid members sharing workflows, results, and optimizations daily. The best n8n SEO automation ideas come from the community, not from me sitting alone tweaking prompts.
Related Posts
- n8n SEO Automation: Complete Beginner's Guide - Get started with n8n for SEO with 5 practical workflows
- AI Marketing Automation: The Open-Source Stack I Use Daily - The full open-source AI marketing stack at $50/month
- Claude Code Just Replaced Your Entire SEO Stack - How I replaced $300/month in SEO tools with one terminal command
Join 2,800+ AI Marketing Builders
Get workflow templates, automation blueprints, and connect with SEOs, agency owners, and creators who ship.
JOIN FREE →